In the world of baking, some recipes are more than just culinary creations; they are cherished heirlooms that are passed down through generations. Ruth’s Grandma’s Pie Crust is one such treasure. This recipe has been a well-guarded family secret, whispered from one apron-clad matriarch to the next. It’s the kind of pie crust that conjures up memories of cozy Sunday afternoons, the warmth of the kitchen, and the comforting aroma of freshly baked pies. In this blog post, we will unravel the mystique of Ruth’s Grandma’s Pie Crust, sharing its ingredients, step-by-step instructions, delightful variations, and handy tips to ensure your pie crust turns out as flaky and delicious as Ruth’s. So, roll up your sleeves, preheat your oven, and get ready to create a pie crust that’s sure to become a family tradition.
Ingredients
Before you embark on your pie crust-making journey, gather the following ingredients:
- 2 1/2 cups of all-purpose flour
- 1 cup (2 sticks) of unsalted butter, cold and cubed
- 1 teaspoon of salt
- 1 teaspoon of granulated sugar
- 6-8 tablespoons of ice water
Instructions
Now that you have your ingredients ready, let’s dive into the art of crafting Ruth’s Grandma’s Pie Crust.
- Chill Out: The key to a flaky crust is to keep everything as cold as possible. Start by placing your cubed butter in the freezer for about 15 minutes before you begin.
- Mix It Up: In a large mixing bowl, combine the all-purpose flour, salt, and sugar. Give it a good stir to evenly distribute the dry ingredients.
- Butter Bliss: Retrieve the chilled butter from the freezer. Add it to the flour mixture and use a pastry cutter or two forks to cut the butter into the flour. You’re aiming for a crumbly texture with pea-sized butter pieces.
- Ice, Ice Baby: Drizzle ice water, one tablespoon at a time, over the butter and flour mixture. Gently mix it in with a fork. Stop adding water when the dough begins to come together.
- Form a Dough Ball: Turn the crumbly dough out onto a clean, floured surface. Bring the dough together and form it into a ball. Avoid overworking the dough, as it can make the crust tough.
- Chill Again: Wrap your dough ball in plastic wrap and refrigerate it for at least 30 minutes. This rest period allows the gluten to relax and ensures a tender, flaky crust.
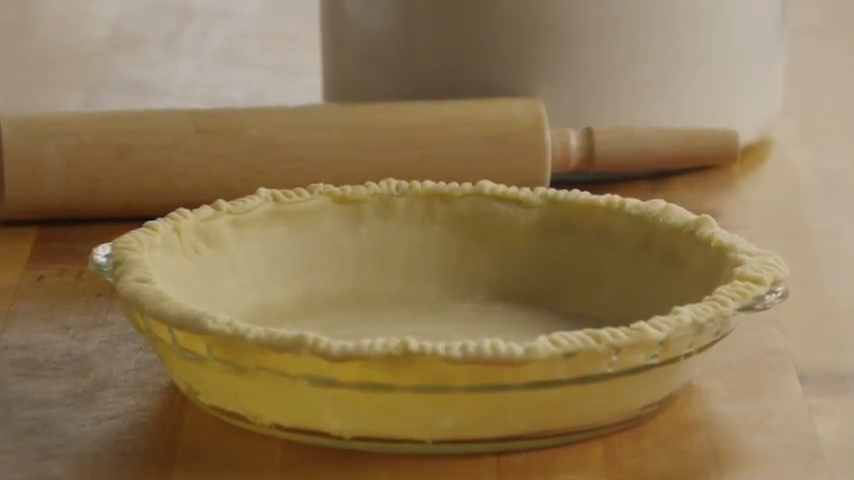
- Roll It Out: Once the dough has chilled, roll it out on a floured surface to your desired size. Remember to flour the rolling pin to prevent sticking.
- Line the Pan: Carefully transfer the rolled-out crust to your pie pan, gently pressing it into place. Trim any excess dough from the edges.
- Blind Baking (Optional): If your pie recipe calls for a pre-baked crust, prick the bottom of the crust with a fork and line it with parchment paper and pie weights (or dried beans). Bake in a preheated oven at 375°F for about 15 minutes.
- Final Touches: Fill your pie crust with your favorite filling and follow the specific baking instructions for your pie recipe.
Variation
While Ruth’s Grandma’s Pie Crust is perfect as it is, you can always add your personal touch to it. Here are a few variations to consider:
- Sweet and Spicy: For a sweet pie crust, add an extra tablespoon of sugar and a dash of cinnamon to the dry ingredients.
- Savory Delight: If you’re making a savory pie, try incorporating herbs like rosemary or thyme into the dough for a flavorful twist.
- Nutty Crunch: Add a unique texture by including finely chopped nuts, like almonds or pecans, to your pie crust.
Tips
Achieving a perfect pie crust takes practice, so here are some tips to help you along the way:
- Quality Butter: Use high-quality, unsalted butter for the best flavor and texture.
- Consistency is Key: Make sure your pie dough is the right consistency. It should hold together without being overly sticky or dry.
- Don’t Skip the Chill: The resting and chilling periods are crucial. Don’t rush them.
- Flour Power: Flour your work surface, rolling pin, and even your hands as needed to prevent sticking.
- Embrace Imperfection: A homemade pie crust doesn’t need to be perfectly round or flawless. It’s the imperfections that make it charming.
In the world of baking, there are recipes, and then there are legends. Ruth’s Grandma’s Pie Crust is an enduring legend, a culinary tradition that transcends time and generations. This humble yet exquisite pie crust is the foundation of countless cherished family recipes. Its flaky, buttery perfection has comforted hearts and filled homes with joy for years. As you embark on your own pie-making journey, remember that this recipe isn’t just about creating delicious pies; it’s about creating cherished memories with loved ones. So, take the time to savor each step, embrace the magic of baking, and make Ruth’s Grandma’s Pie Crust your own family tradition for years to come. Happy baking!