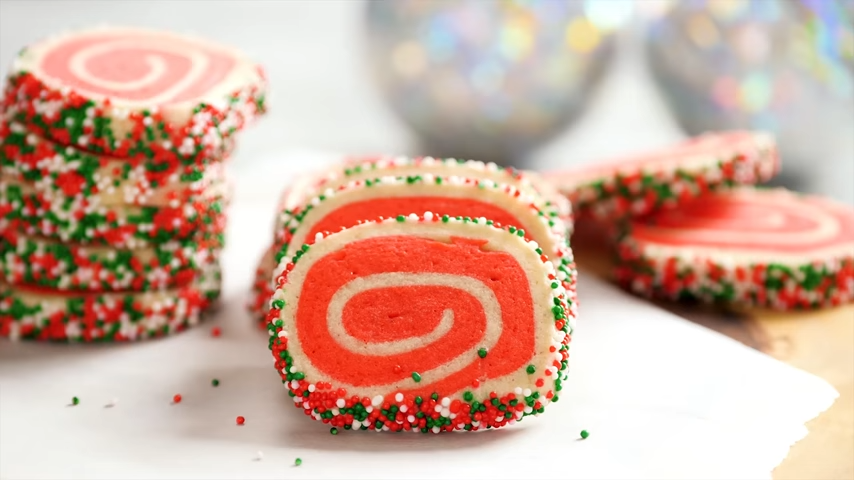
The festive season is upon us, and what better way to kickstart the holiday cheer than by creating a batch of delightful Christmas Pinwheel Cookies? These colorful spirals of joy are a sight to behold and a treat for your taste buds. Whether you’re a baking novice or a seasoned pro, this recipe is bound to add a dash of merriment to your holiday festivities.
Picture this: the faint jingle of bells, the warmth of a crackling fireplace, and the aroma of freshly baked cookies filling your home. That’s the magic of Christmas, and these Pinwheel Cookies are the perfect addition to your holiday repertoire.
In this article, we will guide you through the process of making these mesmerizing treats, starting with the essential ingredients, followed by step-by-step instructions, suggestions for delicious variations, and a few tips to ensure your cookies turn out perfect. So, put on your favorite Christmas apron and let’s embark on this culinary adventure!
INGREDIENTS: Unveiling the Magic Behind Pinwheel Cookies
- 2 ½ cups of All-Purpose Flour: This forms the base of your cookie dough, providing structure and texture.
- 1 cup of Unsalted Butter (room temperature): Creamy, rich butter is the heart of these cookies, lending them a melt-in-your-mouth quality.
- 1 cup of Granulated Sugar: Sweetness is the soul of any cookie, and granulated sugar provides the perfect level of sweetness to balance the richness of the butter.
- 1 large Egg: This binds the dough together, ensuring your cookies hold their shape and texture.
- 1 tsp of Vanilla Extract: A touch of vanilla adds depth to the flavor, making your cookies more complex and irresistible.
- ½ tsp of Almond Extract (optional): For a unique twist, consider adding almond extract to infuse your cookies with a subtle, nutty aroma.
- 1 tsp Baking Powder: This helps your cookies rise and become tender.
- A pinch of Salt: To enhance all the flavors and balance the sweetness.
- Red and Green Food Coloring (gel-based): The key to the visual appeal of Pinwheel Cookies, these colors will make your treats look like edible Christmas decorations.
INSTRUCTIONS: A Step-By-Step Guide to Christmas Cookie Magic
Step 1 – Preparing the Dough:
- In a large bowl, cream together the softened butter and sugar until the mixture becomes light and fluffy. This usually takes about 2-3 minutes of whisking.
- Add the egg, vanilla extract, and almond extract (if you’re using it), and mix until everything is well combined.
- In a separate bowl, whisk together the flour, baking powder, and salt.
- Gradually add the dry ingredients to the wet mixture and mix until the dough forms. It should be soft, yet manageable. If it’s too sticky, add a touch more flour.
Step 2 – Coloring the Dough:
- Divide the dough into two equal parts.
- To one half, add a few drops of red food coloring, and to the other half, add green. Knead each until the color is evenly distributed.
- Wrap each colored dough portion separately in plastic wrap and chill in the refrigerator for about 30 minutes.
Step 3 – Assembling the Pinwheels:
- Once the dough is chilled, roll out each colored portion separately into rectangles of the same size.
- Carefully place the green rectangle on top of the red one, gently pressing them together.
- Starting from the long edge, roll up the dough tightly, creating a colorful log. Wrap it in plastic wrap and refrigerate for another 30 minutes.
Step 4 – Baking the Cookies:
- Preheat your oven to 350°F (180°C) and line a baking sheet with parchment paper.
- Remove the dough log from the fridge and slice it into ¼-inch thick rounds.
- Place the pinwheel slices on the prepared baking sheet, leaving some space between each.
- Bake for 10-12 minutes, or until the edges are lightly golden.
- Let the cookies cool on the baking sheet for a few minutes before transferring them to a wire rack to cool completely.
VARIATION: Putting Your Personal Touch on Pinwheel Cookies
While the classic red and green Christmas Pinwheel Cookies are a delight, there’s always room for a little personalization. Here are a few variations to consider:
1. Peppermint Twist: Crushed candy canes sprinkled on the rolled-out dough before rolling can add a refreshing peppermint twist to your cookies.
2. Citrus Zest: A pinch of lemon or orange zest in the dough can provide a zingy, fruity contrast to the sweet and buttery base.
3. Chocolate Drizzle: Melt some white or dark chocolate and drizzle it over your cooled pinwheel cookies for an extra layer of indulgence.
TIPS: The Finishing Touches for Perfect Pinwheel Cookies
- Chill the Dough: Properly chilled dough is the secret to maintaining the cookie’s shape. Don’t skip this step.
- Sharp Knife: A sharp knife ensures clean cuts and helps maintain the shape of your pinwheels.
- Even Thickness: Roll your dough into an even thickness for consistent baking.
- Storage: To keep these cookies fresh, store them in an airtight container. They can last for about a week, but they’re so tasty, they’re unlikely to stick around for that long.
As you savor the first bite of your Christmas Pinwheel Cookies, you’ll be transported to a world of holiday cheer. These delightful treats capture the essence of the season with their festive colors and irresistible flavor. Whether you’re baking them for your loved ones or for Santa Claus himself, you’ll be spreading joy and creating cherished memories. So, embrace the magic of the season and whip up a batch of these whimsical Pinwheel Cookies – it’s a delightful way to celebrate the most wonderful time of the year. May your holidays be as sweet and colorful as these cookies, and may your heart be as warm as the kitchen where you create them. Happy baking and Merry Christmas!